Battery switch on travel trailer function is crucial for managing your RV’s power. Understanding how these switches work – whether it’s a simple 1-2-both or a more complex setup – is key to preventing dead batteries and ensuring your appliances run smoothly. This guide breaks down the different types, troubleshooting tips, safety precautions, and installation advice, making sure you’re fully equipped to handle your travel trailer’s electrical system with confidence.
We’ll cover everything from identifying your switch type to integrating it with other systems like solar panels. Think of this as your complete handbook for mastering your travel trailer’s battery switch, ensuring safe and reliable power on every adventure.
Types of Battery Switches in Travel Trailers
Choosing the right battery switch for your travel trailer is crucial for managing power efficiently and preventing accidental discharges. Understanding the different types available will help you make an informed decision, whether you’re installing a new system or troubleshooting an existing one. This section will detail the common types of battery switches and their functionality.
Battery Switch Types and Internal Workings, Battery switch on travel trailer function
Travel trailers commonly utilize battery switches that allow you to select which battery bank (or banks) to use, providing control over your 12V system. The most common types are the 1-2-Both and 1-2-Off switches. These switches control the flow of electricity from your batteries to the trailer’s electrical system.
| Type | Description | Advantages | Disadvantages |
|---|---|---|---|
| 1-2-Both | This switch allows you to select either battery 1, battery 2, or both batteries simultaneously. Internally, it uses a rotary selector that connects the appropriate terminals to the output. Imagine three positions on a rotary dial: one connects the output to battery 1, another to battery 2, and the third connects the output to both batteries in parallel. | Simple to use; provides flexibility in using either battery individually or both combined for increased capacity. | Can be less efficient than more sophisticated systems when using both batteries due to voltage drop across the switch. If one battery is significantly weaker than the other, the stronger battery can overcharge the weaker one in “both” mode. |
| 1-2-Off | This switch offers three positions: battery 1, battery 2, and off. The internal mechanism is similar to the 1-2-Both, but lacks the “both” position. The “off” position completely disconnects the batteries from the trailer’s electrical system. | Simple and reliable; prevents accidental drain on the batteries when not in use. Offers good isolation between batteries. | Less flexible than the 1-2-Both switch; you can only use one battery at a time. |
Identifying Your Battery Switch Type
Identifying your battery switch type is straightforward. First, locate your battery switch. It’s usually near your batteries, often in a compartment accessible from the outside of your travel trailer.
- Inspect the Switch Labels: The switch itself will usually be clearly labeled with its positions (1, 2, Both, Off). This is the easiest and most direct method.
- Observe the Switch Operation: Try switching between the different positions. Note which position connects power to which battery or batteries. You can use a multimeter to confirm the power flow at each position.
- Trace the Wiring: If the labels are unclear or missing, carefully trace the wires connected to the switch. Follow the wires to determine which battery (or batteries) are connected in each position. This requires some basic electrical knowledge and caution. Disconnect the power before doing this.
Battery Switch Functionality and Operation
A battery switch in your travel trailer acts as the central control for power flow, managing the connection between your trailer’s battery and your tow vehicle’s charging system. It’s a crucial component for protecting your batteries and ensuring you have power when you need it. Understanding its function and operation is essential for safe and efficient RVing.The primary function of a battery switch is to isolate your travel trailer’s battery from the tow vehicle’s charging system when not connected.
This prevents the trailer battery from slowly draining through parasitic loads (small electrical draws from things like clocks or detectors) when the trailer is disconnected. Without a switch, this constant drain could eventually leave you with a dead battery when you’re ready to hit the road again. Furthermore, the switch allows you to selectively charge either the trailer battery alone or both the trailer and tow vehicle batteries simultaneously.
Battery Switch Operation in Different Scenarios
Proper operation of the battery switch depends on the specific type of switch installed (though the basic principles remain consistent). Generally, you’ll have positions for “Off,” “Battery,” “Both,” and sometimes “Tow Vehicle.” The “Off” position completely disconnects both batteries. The “Battery” position allows only the trailer battery to be used, and the “Both” position connects both the trailer and tow vehicle batteries, allowing the tow vehicle’s alternator to charge both.
So, you’re planning a trip? Awesome! First things first: get travel insurance. Check out Aon travel insurance for solid coverage. Then, think about your entertainment – if you’re an audiophile, you’ll want to plan your audiophile travel setup carefully. Don’t forget your favorite headphones and a portable DAC! Having the right insurance and tunes will make your trip way smoother.
The “Tow Vehicle” position (if present) might be used for specific charging scenarios or might not be needed with certain switch types.
Charging Batteries
To charge your trailer battery, you’ll typically need to connect to shore power (at a campground) or use your tow vehicle’s charging system. Before connecting to shore power, ensure the battery switch is in the “Battery” or “Both” position. When using your tow vehicle, you will also need to be in “Both” position, ensuring the tow vehicle’s alternator is charging both batteries.
Leaving the switch in the “Both” position while towing is generally recommended, especially for longer trips, to maintain a fully charged trailer battery.
Using Appliances
When using appliances in your travel trailer (lights, refrigerator, etc.), the battery switch must be in the “Battery” position to power them from your trailer battery, or the “Both” position to draw from the combined power. Remember to turn off any appliances when not in use to avoid draining the battery. If you are running off of shore power (hooked up to a campsite’s electricity), the battery switch’s position is less critical as the shore power will be the primary power source, but leaving it in the “Battery” or “Both” position allows the battery to be topped up if it’s low.
Troubleshooting Common Battery Switch Issues
Dealing with a faulty battery switch in your travel trailer can be frustrating, but with a systematic approach, you can usually identify and fix the problem. Understanding the common causes of battery switch malfunctions will help you quickly restore power and get back to enjoying your adventures. This section Artikels common problems and provides practical solutions.
Corrosion
Corrosion is a frequent culprit in battery switch malfunctions. The damp environment inside a travel trailer, combined with the electrical currents flowing through the switch, creates ideal conditions for corrosion to build up on the terminals and connections. This buildup can impede current flow, leading to reduced power or a complete loss of power to one or both batteries.
Corrosion often appears as a whitish, greenish, or bluish powdery substance or a dark, almost black, crust.
- Visual Inspection: Carefully examine all terminals and connections for signs of corrosion. Use a flashlight to get a good view into any tight spaces.
- Cleaning the Terminals: Use a wire brush (brass or stainless steel is best) to scrub away any corrosion. For stubborn corrosion, a baking soda paste (baking soda mixed with water) can help loosen it up. After cleaning, apply a dielectric grease to the terminals to prevent future corrosion.
- Tightening Connections: Ensure all terminals and connections are securely tightened. Loose connections can lead to increased resistance and heat buildup, further accelerating corrosion.
Loose Connections
Loose connections, even without visible corrosion, can disrupt the electrical flow through the battery switch. Vibration from travel can loosen nuts and bolts over time, resulting in intermittent power or complete power failure.
- Check all Connections: Carefully inspect all nuts, bolts, and wiring connections associated with the battery switch. Pay close attention to the connections between the battery cables and the switch itself, as well as the connections between the switch and the rest of the electrical system.
- Tighten Connections: If any connections are loose, tighten them securely using the appropriate tools. Do not overtighten, as this can damage the terminals or wiring.
- Replace Damaged Parts: If any terminals or wires are damaged, replace them immediately. Using damaged parts can lead to further problems and potential safety hazards.
Faulty Switches
Sometimes, the battery switch itself may fail. This could be due to internal wear and tear, damage from corrosion, or simply a manufacturing defect. A faulty switch might fail to connect the batteries properly, resulting in a complete loss of power or intermittent power issues. Symptoms may include the switch not clicking into the correct position, or experiencing unusual resistance when switching.
- Testing Continuity: Use a multimeter to test the continuity of the switch in its different positions. If the multimeter doesn’t show continuity when the switch should be closed, the switch is likely faulty.
- Replacement: If the switch is faulty, it will need to be replaced. Ensure you purchase a replacement switch with the correct amperage rating for your system. When replacing, carefully follow the manufacturer’s instructions. Disconnect the battery before starting any work.
Safety Precautions When Working with Battery Switches
Working with batteries and electrical systems in your travel trailer requires careful attention to safety. Improper handling can lead to serious injury, including burns, explosions, and electric shock. Always prioritize safety to protect yourself and your RV.Working with 12-volt DC systems is generally safer than working with 120-volt AC systems, but precautions are still crucial. Batteries contain corrosive chemicals and can generate explosive gases.
Electrical connections can arc, causing burns or fires. A clear understanding of the risks and appropriate safety measures is paramount.
Potential Hazards Associated with Battery and Electrical System Work
Improper handling of batteries can lead to several hazards. Battery acid is highly corrosive and can cause severe burns to skin and eyes. Hydrogen gas, produced during battery charging, is highly flammable and can ignite explosively if exposed to a spark or flame. Incorrectly connecting battery cables can cause short circuits, generating intense heat and potentially starting a fire.
Furthermore, working with electrical systems without proper precautions can lead to electric shock, resulting in injury or even death. Always assume that any electrical component is live until proven otherwise.
Safety Equipment for Working with Battery Switches
Before starting any work on your travel trailer’s battery system, gather the necessary safety equipment. This includes:
- Safety Glasses: Protect your eyes from splashing battery acid or flying debris.
- Rubber Gloves: Insulate your hands from electric shock and protect them from battery acid.
- Closed-toe Shoes: Protect your feet from potential hazards on the ground.
- Insulated Tools: Use tools with insulated handles to prevent electric shock. This includes screwdrivers, wrenches, and pliers.
- Battery Terminal Cleaner: Ensure clean connections to prevent arcing and corrosion.
- Baking Soda: Neutralize battery acid spills.
- Water: Flush away spilled battery acid.
- Ventilation: Ensure adequate ventilation to dissipate hydrogen gas buildup. Working outdoors or in a well-ventilated area is recommended.
Remember, proper safety practices are essential when working with batteries and electrical systems. Always disconnect the negative battery terminal first when working on the system and reconnect it last. Take your time, and if you are unsure about any procedure, consult a qualified RV technician.
Battery Switch Selection and Installation: Battery Switch On Travel Trailer Function
Choosing and installing the right battery switch is crucial for safe and reliable power management in your travel trailer. A properly installed switch protects your batteries, prevents accidental discharges, and simplifies managing your power sources. This section guides you through selecting the appropriate switch and installing it correctly.Selecting the correct battery switch involves considering your trailer’s electrical system and battery configuration.
Factors like the number of batteries, their voltage (12V or 24V), and the amperage draw of your appliances will dictate the switch’s specifications. Overlooking these factors can lead to a switch that’s either underpowered and prone to failure or unnecessarily oversized and expensive.
Battery Switch Selection Criteria
Choosing the right battery switch depends on several factors. First, determine the number of batteries in your system. A single battery system needs a simple on/off switch, while dual battery systems require a switch that can isolate or combine the batteries. Next, confirm the voltage of your batteries (typically 12V). The switch must match this voltage.
Finally, calculate the total amperage draw of your appliances to ensure the switch’s amperage rating is sufficient; a higher rating provides a safety margin. For example, if your appliances draw a combined 100 amps, a 150-amp switch would be a safer choice than a 100-amp switch.
Step-by-Step Battery Switch Installation
Installing a battery switch involves careful wiring and secure mounting. Always disconnect the negative terminal of your batteries before beginning any electrical work. This prevents accidental shorts and protects you from electrical shock.
So, you’re planning a trip? Awesome! First things first: get yourself sorted with travel insurance. Check out Aon travel insurance for solid coverage. Once that’s done, you can focus on the fun stuff, like your audiophile travel setup. Seriously, don’t underestimate how much better your journey will be with your favorite tunes.
Planning ahead makes all the difference!
- Gather Tools and Materials: You’ll need a battery switch with appropriate amperage and voltage rating, wiring (heavy-gauge marine-grade wire is recommended), wire connectors, a wire stripper/crimper, a drill, mounting hardware, and safety glasses.
- Choose a Mounting Location: Select a location that is easily accessible, well-ventilated, and protected from the elements. Consider proximity to your batteries for shorter wire runs.
- Mount the Switch: Securely mount the switch to a sturdy surface using the provided hardware. Ensure the switch is level and stable.
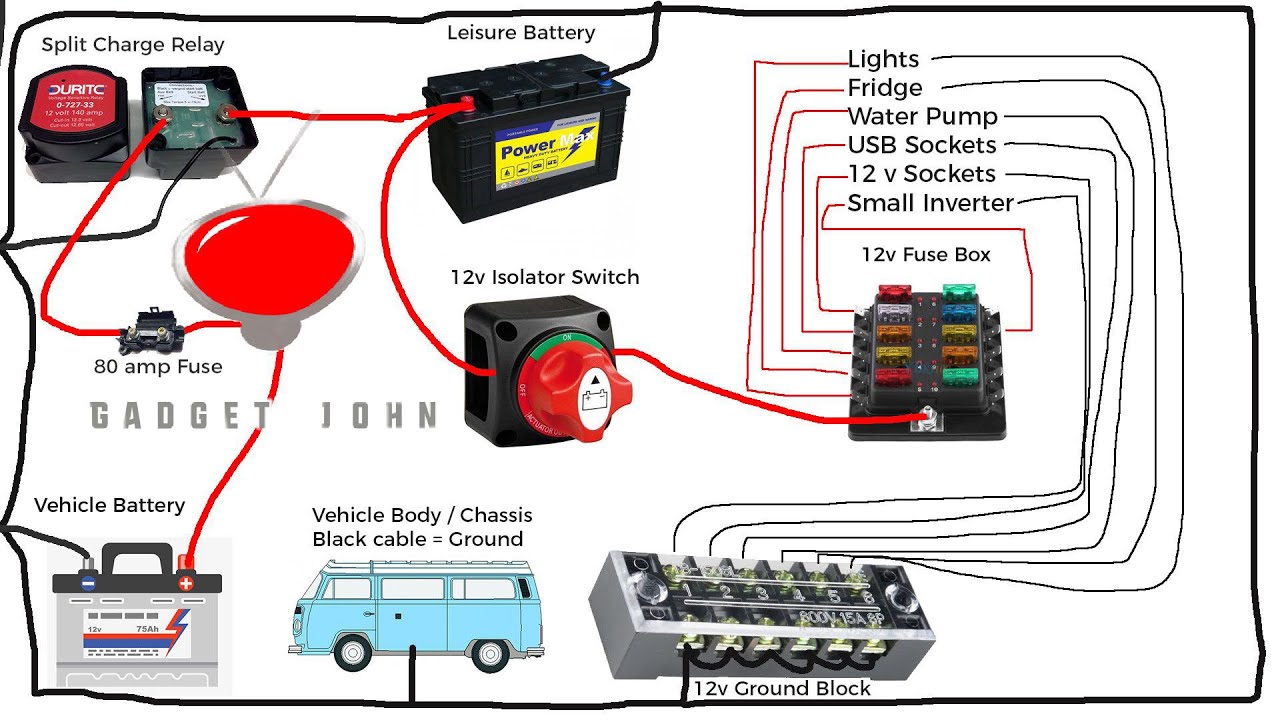
- Wire the Switch: Connect the positive (+) cable from your main battery to the input terminal of the switch. From the switch’s output terminal, run a cable to the main power distribution panel of your trailer. If you have a dual battery setup, connect the positive cables from both batteries to their respective input terminals on the switch, ensuring correct polarity.
Finally, connect the negative (-) cables directly to your battery’s negative terminals. Use appropriate-sized wire connectors to ensure secure and corrosion-resistant connections. A typical dual battery setup wiring diagram would show the batteries connected to the switch’s input terminals, with the switch output connected to the main power distribution panel. The negative terminals are directly connected to their respective batteries.
- Test the Installation: After completing the wiring, reconnect the negative battery terminals. Carefully test the switch’s functionality, ensuring that each battery and the combined system operates as expected. Use a multimeter to verify voltage and amperage readings. Check for any loose connections or unusual heating.
Best Practices for Battery Switch Installation
Proper installation is key to preventing future problems. Use high-quality marine-grade wire to withstand vibration and moisture. Always use appropriate-sized wire connectors and crimp them securely to prevent loose connections and potential fire hazards. Label all wires clearly for easy identification during maintenance or troubleshooting. Use dielectric grease on all connections to prevent corrosion.
Regularly inspect the switch and wiring for any signs of damage or corrosion. A well-maintained battery switch will ensure years of reliable service.
Battery Switch and its Relation to Other Trailer Systems
Your battery switch isn’t an isolated component; it’s a crucial link in your travel trailer’s electrical ecosystem. Understanding its interaction with other systems like solar panels and converters is vital for efficient power management and preventing potential problems. This section will explore how your battery switch affects overall electrical performance and how to best integrate it with other power management solutions.The battery switch acts as the central on/off control for your house batteries, influencing the flow of power to various systems.
Its configuration directly impacts how your solar panels charge your batteries, how your converter operates, and ultimately, how much power is available to your appliances. A poorly configured or improperly functioning switch can lead to inefficient charging, reduced power availability, or even damage to sensitive electronics.
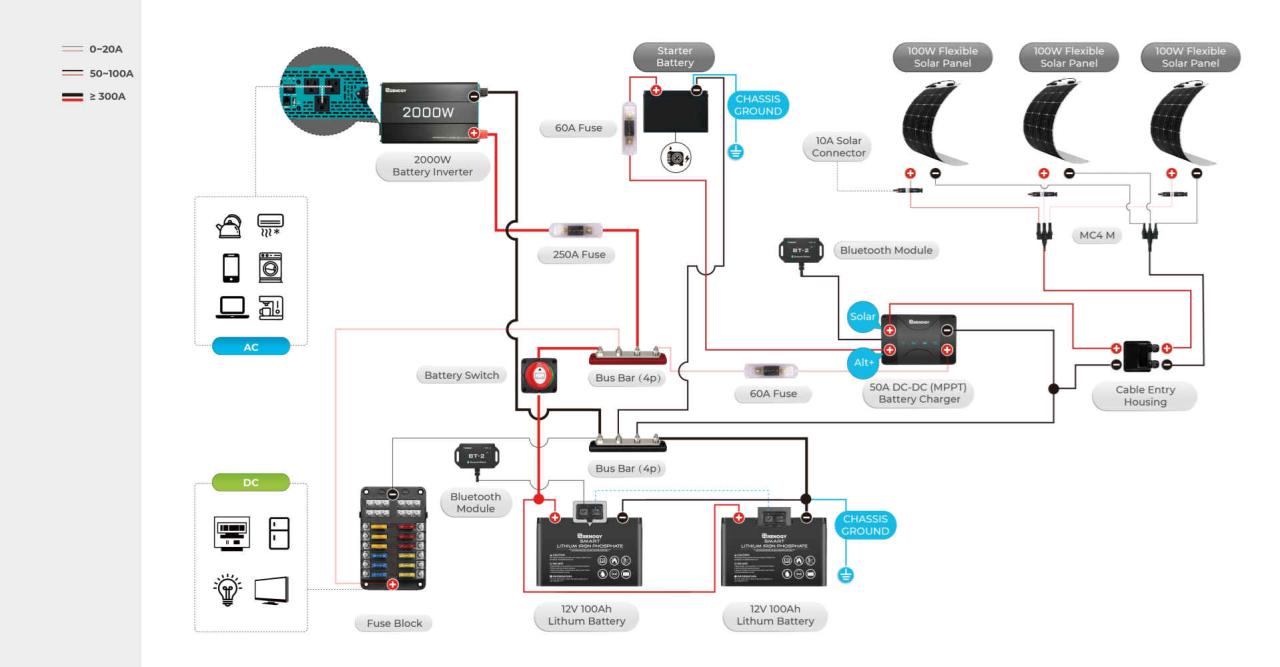
Solar Panel Integration
Solar panels generate DC power, and this power needs to be routed to your batteries for storage. The battery switch plays a key role here. With the switch in the “on” position, the solar charge controller can safely direct the solar energy to the batteries for charging. If the switch is off, the solar panels will likely stop producing power (depending on your charge controller’s design), preventing overcharging or damage to the system.
Some more sophisticated charge controllers may have the ability to regulate charging regardless of the battery switch position, however. This highlights the importance of understanding your specific solar charge controller’s functionality.
Converter Interaction
Your converter transforms AC power from your shore power connection or generator into DC power to charge your batteries. The battery switch determines whether the converter can access and charge your house batteries. With the switch “on,” the converter will charge the batteries, and the battery switch’s configuration will also influence the overall charging rate and efficiency. If the switch is off, the converter will either stop charging or attempt to charge without connecting to the batteries, which could potentially damage the converter.
Again, the exact behavior depends on the converter’s design and safety features.
Different Battery Switch Configurations and Their Effects
Different battery switch configurations can significantly impact your electrical system’s performance. A simple on/off switch provides basic control, but more advanced switches allow for isolating individual battery banks, which can be beneficial for managing different battery types or isolating a problem battery. A switch that allows for combining battery banks provides greater power capacity but requires careful consideration of voltage and amperage compatibility.
For example, using a switch to combine two 12V battery banks increases available amperage but remains at 12V, while incorrectly combining batteries of different voltages could damage the system.
Integrating with Power Management Systems
Integrating your battery switch with a sophisticated power management system (PMS) can optimize your trailer’s energy efficiency. Many PMS systems provide features such as remote monitoring, automatic switching based on battery voltage, and prioritized power distribution. The PMS can often communicate with the battery switch, automatically switching between battery banks or disconnecting the batteries to protect against over-discharge.
This level of integration requires careful planning and installation to ensure compatibility between the switch and the PMS.
Maintenance and Upkeep of Battery Switches
Keeping your travel trailer’s battery switch in top condition is crucial for reliable power and preventing costly repairs down the road. Regular maintenance ensures smooth operation and extends the lifespan of this vital component. Neglecting maintenance can lead to corrosion, poor connections, and ultimately, battery switch failure, leaving you stranded without power.Regular inspection and cleaning are key to preventing problems before they arise.
A well-maintained switch will provide years of trouble-free service. This section details a simple maintenance schedule and practical cleaning methods to keep your battery switch functioning optimally.
Routine Maintenance Schedule
A proactive approach to battery switch maintenance involves regular inspections and cleaning. A good schedule is to inspect the switch visually every three months and perform a more thorough cleaning and lubrication annually, or more frequently if operating in harsh environments (e.g., coastal areas with high salinity). This preventative approach can significantly extend the lifespan of your battery switch and avoid unexpected breakdowns.
Cleaning and Lubricating the Battery Switch
Before beginning any cleaning or maintenance, always disconnect the battery’s negative terminal. This is a crucial safety precaution to prevent accidental shocks or short circuits. Once disconnected, use a wire brush or a suitable cleaning tool to remove any dirt, corrosion, or debris from the switch terminals and surrounding areas. Pay close attention to the contact points, ensuring they are clean and free of any buildup.
After cleaning, apply a small amount of dielectric grease to the switch terminals and moving parts. Dielectric grease prevents corrosion and ensures smooth operation. Avoid using petroleum-based lubricants, as these can attract dirt and damage the switch.
Preventative Measures to Extend Lifespan
Several preventative measures can significantly extend the life of your battery switch. These include using corrosion inhibitors on the terminals, keeping the switch area clean and dry, and ensuring proper ventilation to prevent moisture buildup. Regularly checking the tightness of all connections is also important. Loose connections can lead to increased resistance and heat buildup, potentially damaging the switch.
Finally, choosing a high-quality, weatherproof battery switch during installation will provide better long-term protection against the elements. Consider the environment your trailer is exposed to when selecting a switch; a marine-grade switch, for example, is more resistant to corrosion than a standard switch.
Mastering your travel trailer’s battery switch isn’t just about avoiding a dead battery; it’s about ensuring safe and efficient power management for all your adventures. By understanding the different types, troubleshooting common issues, and following safety procedures, you can confidently navigate the electrical systems of your RV. Remember regular maintenance and proper operation are key to extending the life of your switch and keeping your power flowing smoothly – so get out there and enjoy the open road!
FAQ Summary
How often should I check my battery switch?
Before each trip and at least every 3 months, inspect for corrosion and loose connections.
What happens if I leave my battery switch in the “both” position?
Leaving it in “both” constantly can drain your tow vehicle’s battery if it’s not charging the trailer battery.
Can I install a battery switch myself?
While possible, it’s recommended to have an experienced RV technician handle installation if you’re not comfortable working with electrical systems. Incorrect wiring can be dangerous.
My battery switch is making a clicking noise. What’s wrong?
A clicking sound often indicates a faulty switch or a low battery. Check your battery voltage and consider replacing the switch.
